


Ali Invoice – Instructions
Your Ultimate, Effortless AliExpress Invoicing Solution
VERSION 0.6.1.0
INSTRUCTIONS FOR VERSION 0.8.2.9 COMING SOON
ALI INVOICE INSTRUCTIONS – TABLE OF CONTENTS
INSTALLATION
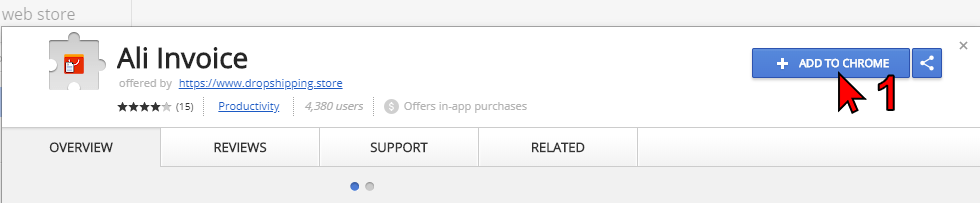
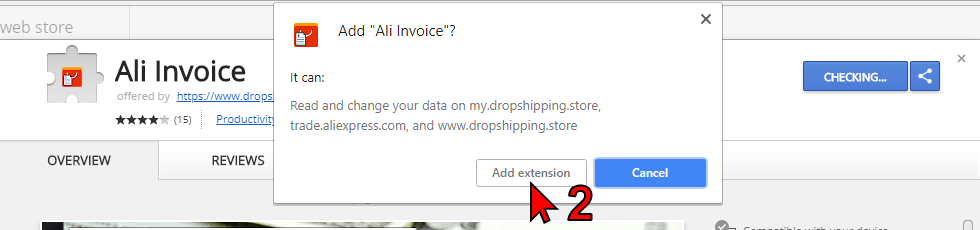
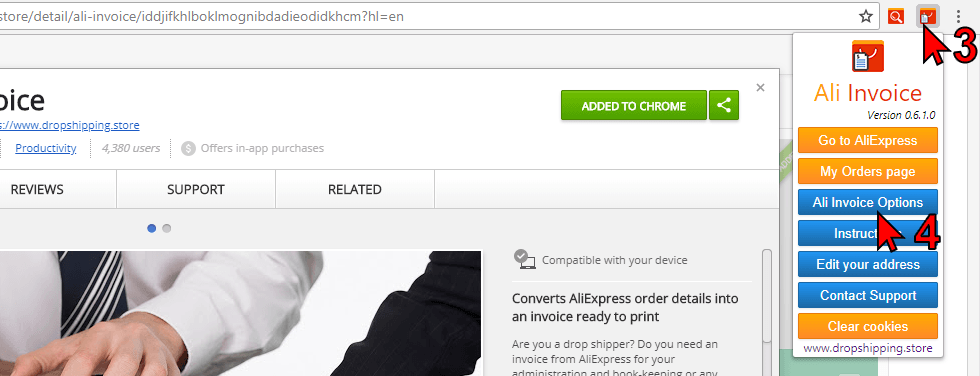
- Install the Ali Invoice extension from Chrome Web Store – click here – 1 & 2
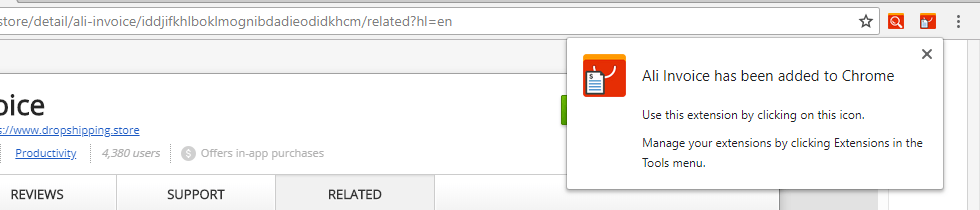
- Ali Invoice is added to Chrome
- Click on the Ali Invoice icon and go to Options – 3 & 4
OPTIONS PAGE
ACTIVATION
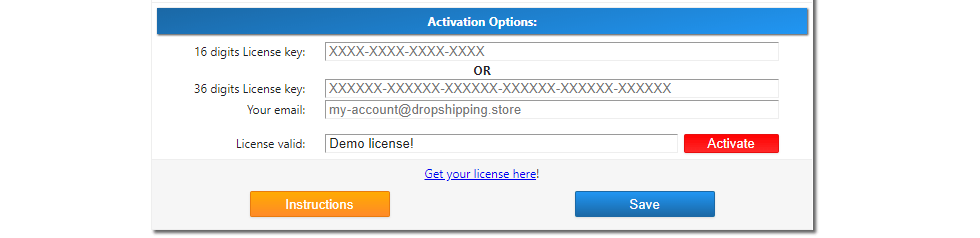
- First you’ll have to activate Ali Invoice
- Scroll to the bottom of Options page, paste your 36 digits license/serial key AND your email and click Activate
- If you have 16 digits license/serial key (purchased before March 7th 2018) you can use it (without email) but you will not be able to edit your company address. Contact us for a new 36 digits key
- Without the license key, ‘Demo license’ will be shown instead of your company address.
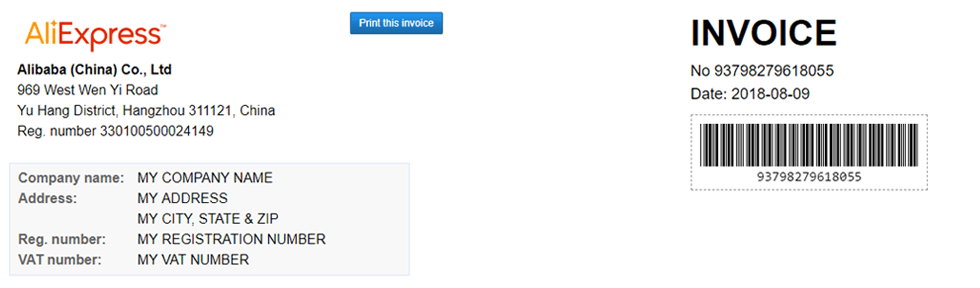
SELLER’S COMPANY INFO (1)
- Enter seller’s company name. If you want to use Alibaba, please consult with your accountant. Alibaba company info for their international offices can be found on this link.
- Do NOT use AliBaba/AliExpress company info if you need to send proof of purchase to PayPal, eBay, Stripe etc. Yes, they do accept these invoices if you use some other info.
- Url to your seller’s logo. Optimal image dimensions are 166×40 px. If you leave this field blank, AliExpress logo will be used. If you wish to use Alibaba logo, just type
alibaba. If you don’t want to use any logo, typenologo - Your seller’s address
- Your seller’s city, state, ZIP code & country
- Additional text for your vendor, e.g.
Reg. number,VAT, or whatever you want. Enter the exact words (title) you need, not the value. You can leave this field blank if you want. - Value for the previous field. Here you should enter registration or VAT number. You can leave this field blank too.
- If you enter aliexpress store number, these company details will be used automatically whenever you generate an invoice for orders from that store.
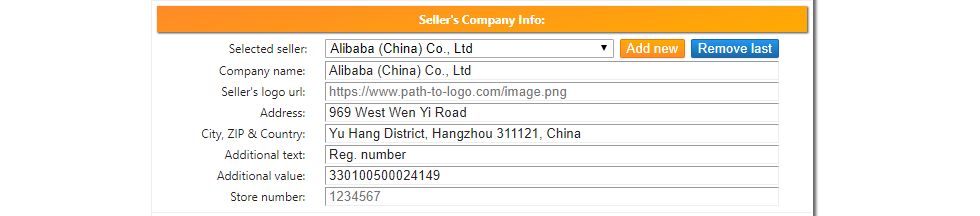
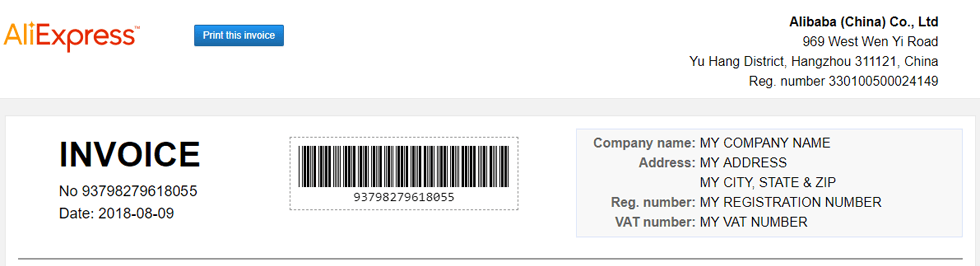
- It will look like this on generated invoices

YOUR COMPANY INFO (2)
- Enter your company name
- Your shipping address on dropshipping.store website will be used as your company address
- Reorder City, ZIP Code, State & Country and choose separators
- If you want to use your registration or VAT number, type
Reg. NumberorVAT Numberinto the ‘Additional text’ field. This should be a title and not the value itself. - In ‘Additional value’ field enter your registration or VAT number itself
- If you want to use both, you can use <br> tag for a new line. In ‘Additional text’ field enter this
Reg. Number:<br>VAT Numberand in ‘Additional value’ field useYOUR REGISTRATION NUMBER<br>YOUR VAT NUMBERReplace values in capital letters with your real values.

- It will look like this on generated invoices

GENERAL OPTIONS
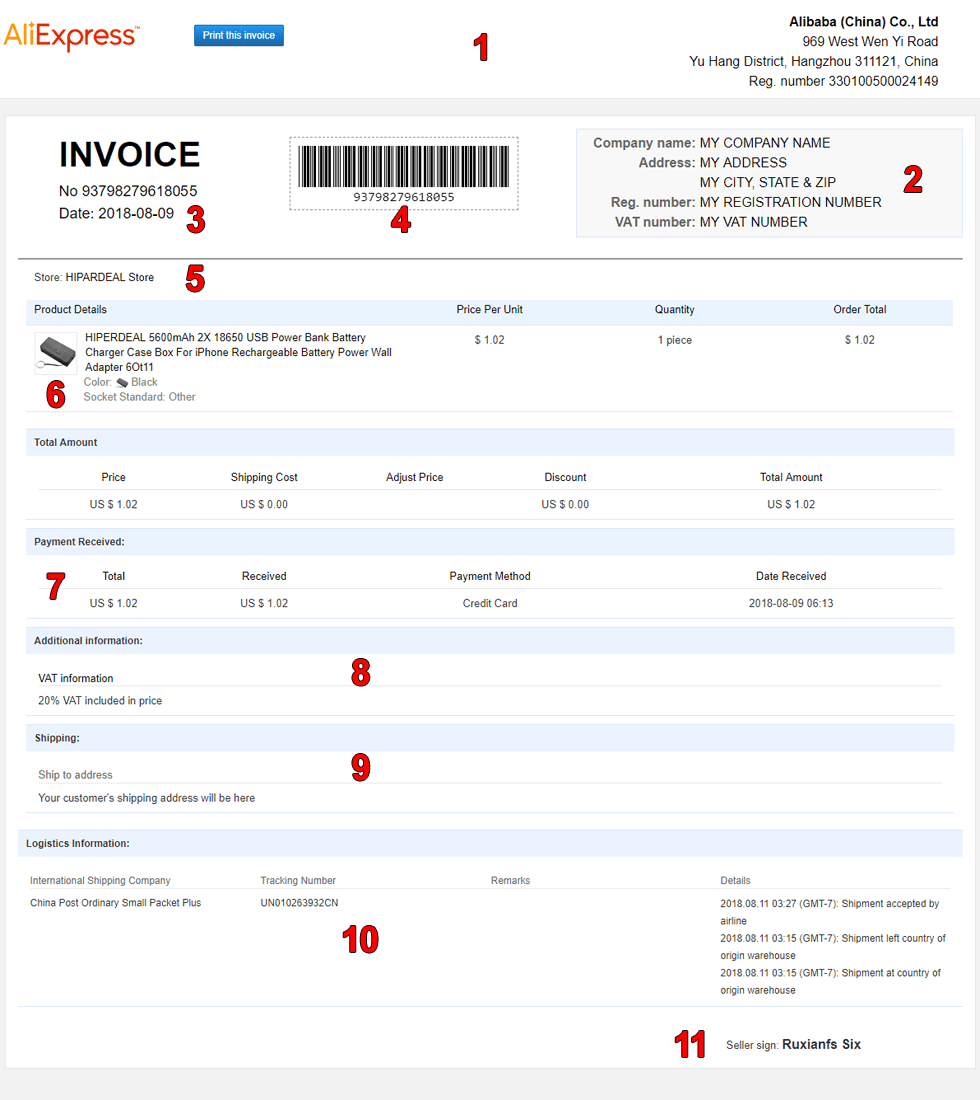
- You can hide product images from invoices (6) – See sample below
- Select barcode type you would like to use (4)
- Select one of three templates – samples below
- Choose date format (3)

SINGLE INVOICE OPTIONS
- Enter ‘Additional text’ title (8) – See sample below
- Enter ‘Additional text’ subtitle (8)
- Enter ‘Additional text’ value (8)
- Check ‘Show additional text’ if you want these displayed on ivoices
- Show seller sign (11)
- Show logistics information (10) – This info may not be available if your order hasn’t been shipped yet.
- Show AliExpress store name (5)
- Show shipping address (9)

SINGLE INVOICE SAMPLE
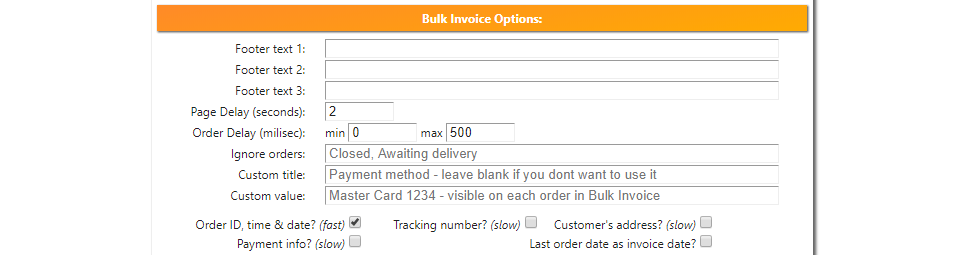
BULK INVOICE OPTIONS
- If you want some texts to be shown in the footer of Bluk Invoice, enter their value. HTML tags are allowed in the footer. Use
<br>for new line,<b>your bold text</b>for your bold text,<i>your italic text</i>for your italic text, and others - Set the delay the extension will wait before moving to next orders page when generating a bulk invoice
- If you need additional text displayed next to each order, enter its title and value
- Check what other information you want to be displayed next to each order. Options marked as slow will take some time as the extension has to check each individial order when generating an invoice.
- By default, today’s date is used on an invoice. You can use the date from your most recent order instead by selecting ‘Last order date as invoice date’
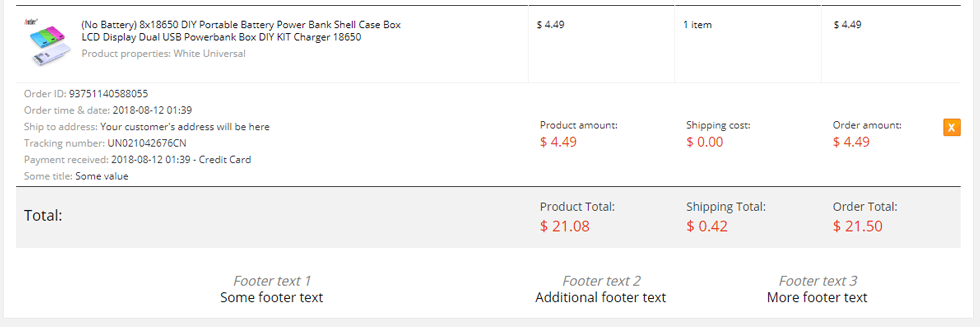
BULK INVOICE SAMPLE
INVOICE TEMPLATES
- Template 1
- Template 2
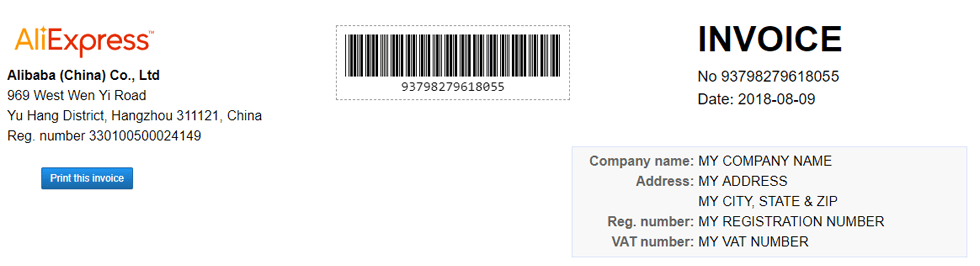
- Template 3
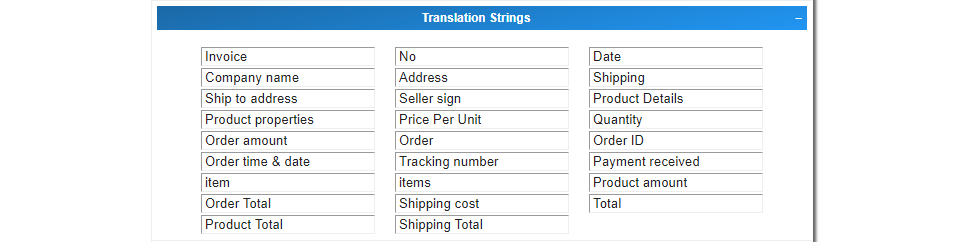
TRANSLATION STRINGS
You can translate invoices using these fields. All fields are used on bulk invoice as it is generated from scratch and only some on single invoice. If you want to translate a single invoice, right click somewhere on the invoice and choose the equivalent of ‘Translate to English’ in your language.
CSV EXPORT OPTIONS
- You can choose which fields to export to CSV here. If you want to export customers Name, Addres & Phone number, you’ll have to have Oberlo extension installed and enabled. You don’t need to use Oberlo, just activate the extension while exporting to CSV.
- ‘Tracking number’ will significantly slow the exporting process.

using ALI INVOICE
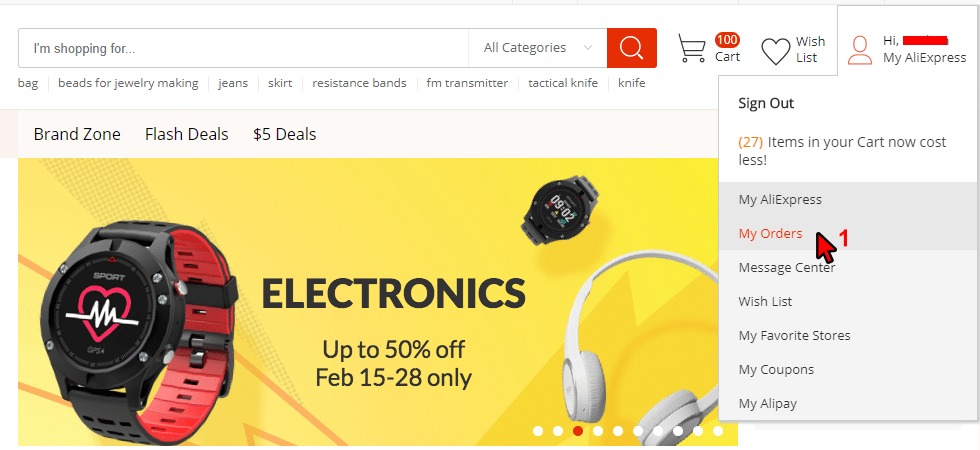
- Log in to AliExpress and go to ‘My Orders’ page (1)
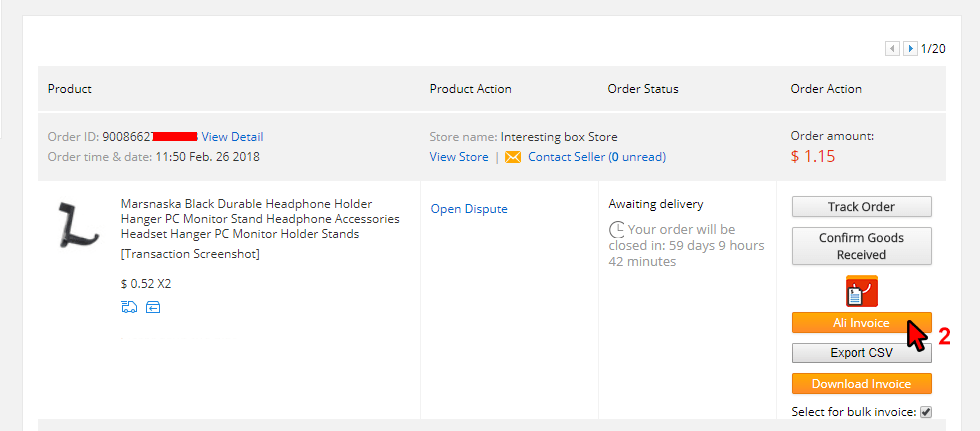
- Click on the Ali Invoice Button
 for desired order (2)
- Your invoice is generated and ready to print (3)

- In the print dialog choose your printer or ‘Save as PDF’ or ‘Microsoft Print to PDF’ or whatever PDF printer you have installed (4). If you don’t have any, google
free print to pdf softwareand pick the one you like. - Uncheck
Headers and footers(5) - Click
Save(6)
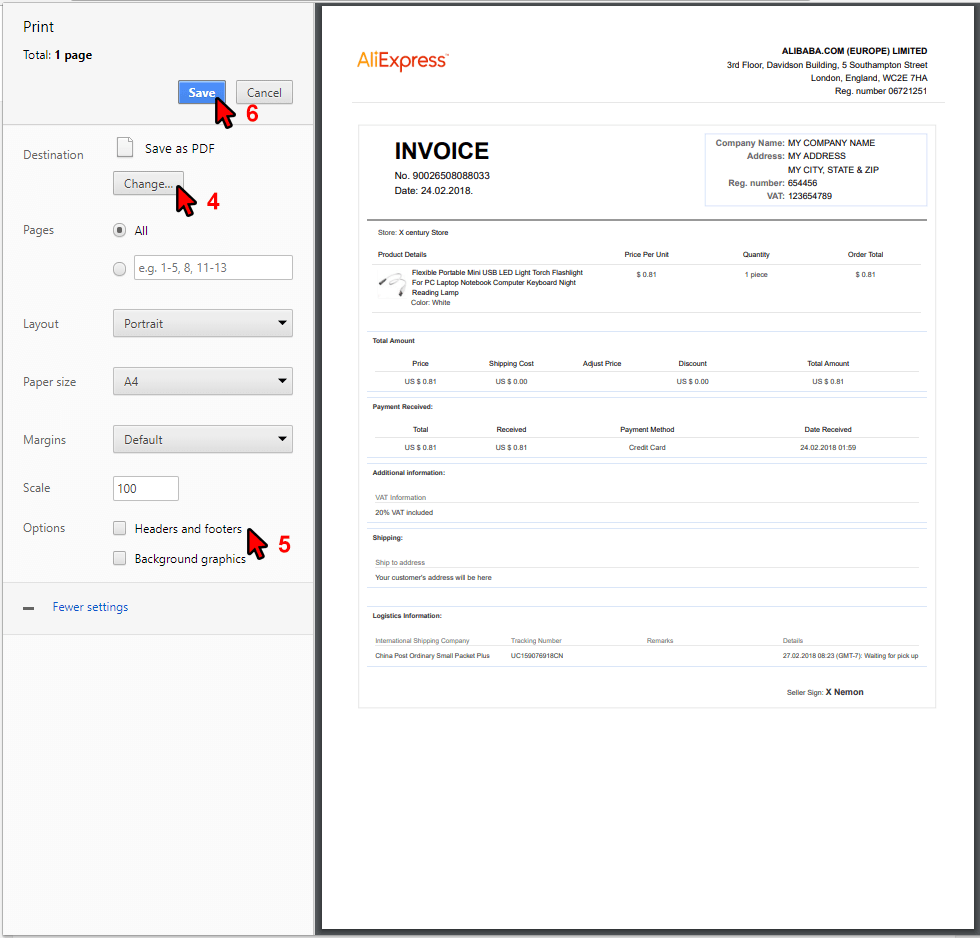
- Filename is in the format
YYYY-MM-DD Invoice No 1234567890.pdf
USING BULK INVOICE
- Now you have a new section on your Orders page.

- From here, you can generate a single invoice for all, or only for selected orders, or for any given period.
- Enter the invoice number. If you leave it blank, the order number from the most recent order will be used.
- Pick the date for the invoice. Today’s date is the default. You can change it on the options page to last order date.
- If you click
'Bulk Invoice All'the invoice will be generated for all the orders on the page ignoring any ‘Select for bulk invoice’ box that you’ve unchecked. - If you click
'Bulk Invoice Selected'the invoice will be generated only for the orders for which the ‘Select for bulk invoice’ is checked. -
Select/Deselectbutton is used to quickly select/deselect all orders on the page instead of clicking each ‘Select for bulk invoice’.
- This is how the invoice will look like. All these, fields are editable here when you click on any of them.
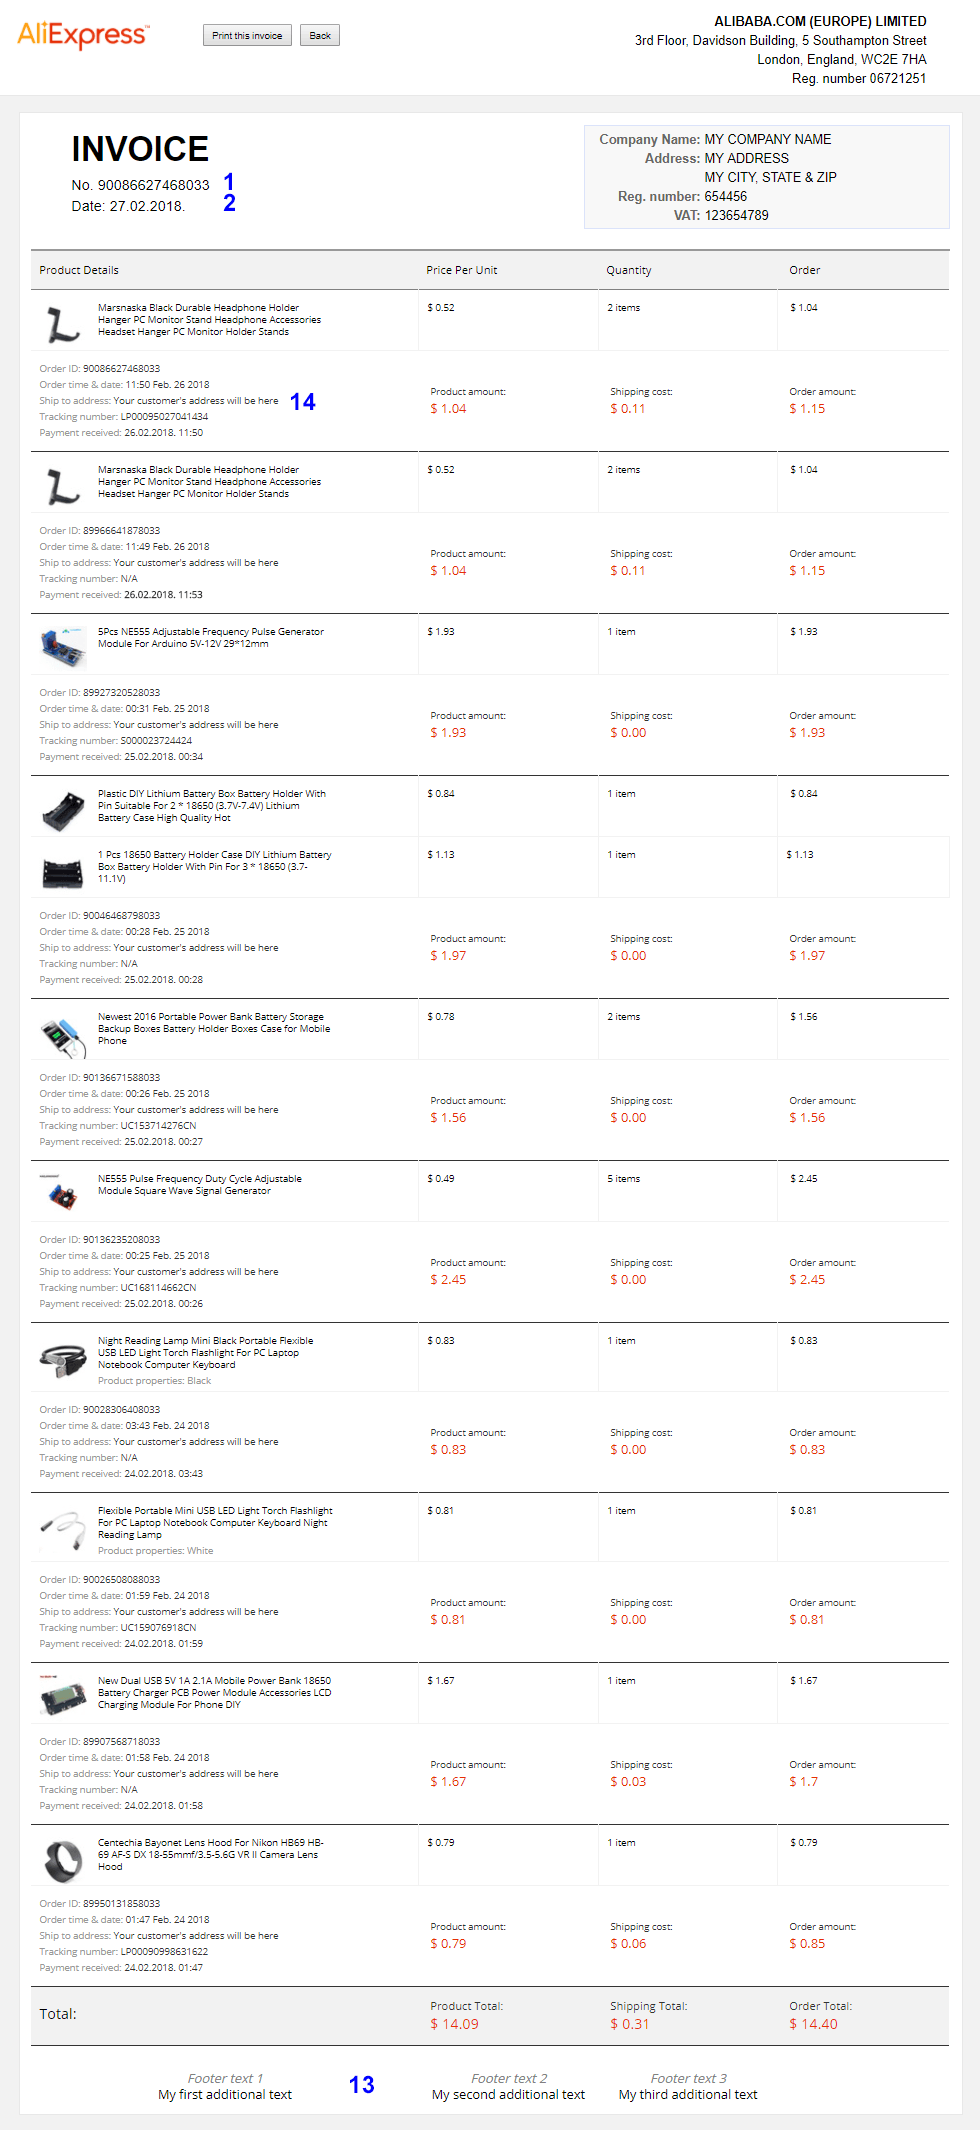
- Footer text – 13 – can be changed on the Options page
BULK INVOICE PERIOD
- Clicking on
'Bulk Invoice Period'will generate an invoice for any given period. If you close the tab for any reason while work is in progress, you may need to clear cookies if you experience problems afterwards. Click on Ali Invoice icon right of the address bar, select ‘Clear cookies’ and just click ‘remove all’. - Have in mind that generating a bulk invoice starts from a page you are currently on and continues page by page. Always start from the AliExpress Orders page that contains your last order for desired period or start from the first page.
- This is an old option. Now it is much faster and more reliable to use
'Bulk Invoice Filtered'instead. - Click on ‘More Filters’, pick a date range, click ‘Search’ and then click
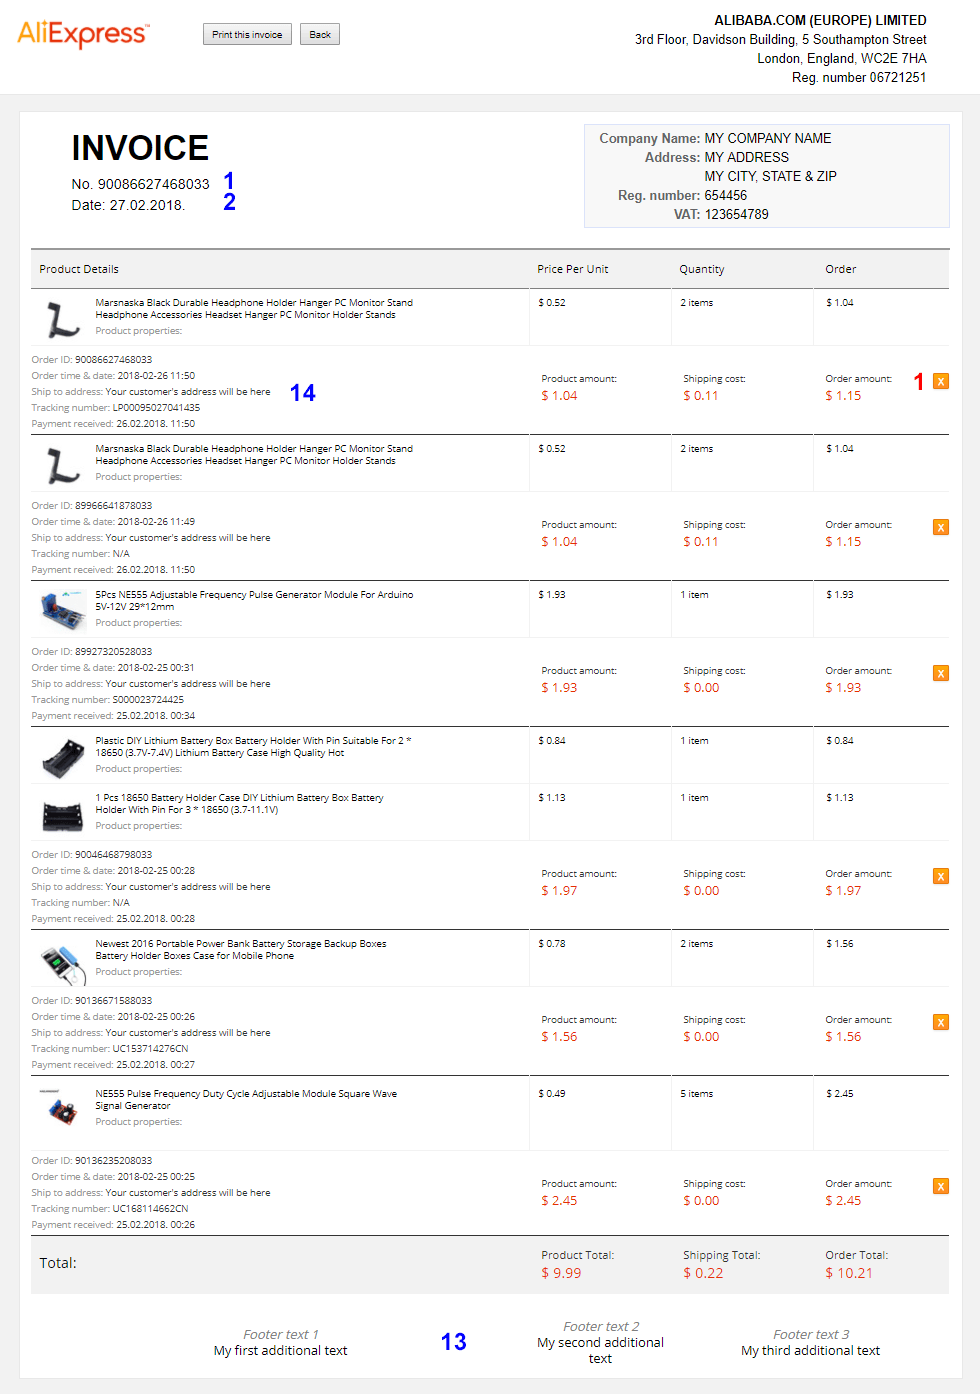
'Bulk Invoice Filtered' - This is how the invoice will look like. All these fields are editable here when you click on ony of them.
- If you don’t want an order to be included in an invoice, delete it by clicking on X next to an order (1).
CSV EXPORT
These options are self explanatory.
- Clicking on
CSV Export this pagewill export all orders from a page you are currently on -
CSV Export all pageswill export all orders. Be patient, it may take some time. -
CSV Export periodwill export all order from a given period. Exporting starts from a page you are currently on so it is good to be on the first page in order to avoid skipping some orders. - You can export to CSV individual orders by clicking
Export CSVbutton - It is advisable to use
'CSV Export Filtered'instead of'CSV Export Period'as it is faster and more reliable.
DOWNLOAD INVOICES
- You can download an invoice directly by clicking either on – 1 – for all orders on this page, or – 2 – for single order.

- Invoices will be downloaded in .html format. Converting them directly to .pdf would require an external service and a subscription plan.
- You can convert html to pdf after you download all your invoices.
- Download THIS archive and unpack it in a folder where your invoices are located. (Windows 64bit machines)

- Running
convert.batwill convert all invoices in a folder to .pdf. - Running
convert-delete.batwill convert all invoices and delete .html files after conversion is finished. - This solution is for 64bit Windows machines only. Wkhtmltopdf for other machines can be downloaded from this link.
CONTACT US
- Questions? Bug reports? Feature requests?